Welcome to our comprehensive guide on adding a new game controller mapping under AntiMicro. We understand the importance of optimizing your gaming experience and customizing it to suit your preferences. With AntiMicro, a powerful open-source controller mapping tool, you have the flexibility to configure game controllers according to your unique requirements.
In this guide, we will walk you through the step-by-step process of adding a new game controller mapping, ensuring that you can seamlessly integrate your preferred controller with AntiMicro. So, let’s dive right in!
Prerequisites
Before we begin, there are a few prerequisites that need to be in place to ensure a smooth setup process. Please make sure you have the following:
- AntiMicro Installed: Ensure that you have AntiMicro installed on your system.
- Game Controller: You will need a game controller that you wish to map and configure under AntiMicro. Connect your controller to your computer using a compatible cable or via Bluetooth.
- Basic Familiarity with AntiMicro: This guide assumes that you have a basic understanding of AntiMicro’s interface and functionality.
Now that we have the prerequisites covered, let’s proceed to the main steps of adding a new game controller mapping under AntiMicro.
Step 1: Launching AntiMicro
- Launch the AntiMicro application on your computer by locating the shortcut or opening it from the installed applications list.
- Once AntiMicro is up and running, you will be presented with the main interface, which provides various options for controller configuration.
Step 2: Creating a New Mapping Profile
- To create a new mapping profile for your game controller, click on the “Profiles” tab located in the top navigation menu of AntiMicro.
- In the profiles section, click on the “New” button to initiate the profile creation process.
- Provide a suitable name for your profile, such as “My Game Controller Mapping,” to easily identify it later.
- If desired, you can also add a brief description or notes for the profile, which can help you remember specific details or preferences associated with it.
- Once you have entered the necessary details, click on the “Create” button to generate the new mapping profile.
Step 3: Mapping Controller Buttons
- With the new mapping profile created, it’s time to map the buttons of your game controller. This process allows you to assign desired keyboard keys or mouse functions to specific buttons on your controller.
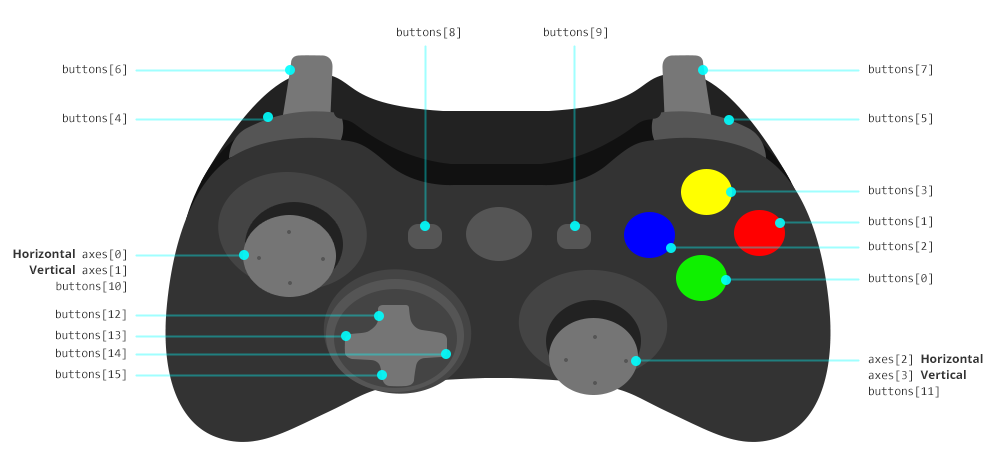
- In the mapping profile interface, you will see a visual representation of a game controller. Each button on the controller will be accompanied by a corresponding text field or dropdown menu.
- Start by identifying the button on your game controller that you wish to map. Click on the corresponding text field or dropdown menu next to the button representation in AntiMicro.
- In the text field or dropdown menu, select the desired keyboard key or mouse function that you want to assign to the button.
- Repeat this process for each button on your game controller, ensuring that you configure them according to your preferences.
- As you proceed with button mapping, you can save your progress periodically by clicking on the “Save” button within the mapping profile interface.
Step 4: Fine-tuning Controller Configuration (continued)
- Once you have mapped all the buttons, it’s time to fine-tune your controller configuration to achieve optimal performance.
- In the AntiMicro interface, you will find additional options and settings to further customize your controller mapping.
- Sensitivity Adjustment: AntiMicro allows you to adjust the sensitivity of your controller’s analog sticks or triggers. This feature is particularly useful for games that require precise control over movement or aiming. Experiment with different sensitivity levels to find the setting that feels most comfortable and responsive for you.
- Deadzone Configuration: Deadzone refers to the area around the analog sticks or triggers where minimal input is registered. Adjusting the deadzone can eliminate any unwanted or accidental movements when the controller is at rest. Fine-tune the deadzone settings to ensure smooth and accurate control during gameplay.
- Button Combinations: AntiMicro supports the creation of button combinations, allowing you to assign multiple inputs to a single button press. This feature can be handy for executing complex actions or macros with ease. Explore the options provided by AntiMicro to set up button combinations according to your specific gaming needs.
- Advanced Settings: For advanced users, AntiMicro offers additional settings to further enhance controller mapping. These settings include inverted axis control, axis range adjustments, and advanced modifier key assignments. Take the time to explore these settings if you require more advanced customization options.
- Remember to save your changes regularly to ensure that your customized controller mapping is preserved.
Step 5: Testing and Refining
- With your controller mapping configured, it’s essential to test it within a game environment to ensure its functionality and responsiveness.
- Launch a game that supports game controllers and navigate to the game’s settings or control configuration menu.
- In the game’s settings, locate the controller configuration section and select your mapped controller profile from the available options.
- Start playing the game and verify that your controller inputs are correctly translated and that the mapped buttons and functions perform as expected.
- If you encounter any issues or find that certain buttons or functions are not working correctly, return to the AntiMicro interface and make the necessary adjustments to your mapping profile.
- Repeat the testing and refining process until you are satisfied with the performance and functionality of your customized controller mapping.
Conclusion
Congratulations! You have successfully learned how to add a new game controller mapping under AntiMicro. By following the step-by-step instructions in this guide, you can now enjoy a personalized gaming experience that caters to your preferences and playstyle.
Remember to explore the various customization options provided by AntiMicro, such as sensitivity adjustment, deadzone configuration, button combinations, and advanced settings, to further optimize your controller mapping.
If you require any further assistance or have additional questions, please refer to our support resources or reach out to our dedicated customer support team. Happy gaming!